

Loyalist Dave
Active member
- Joined
- May 18, 2025
- Messages
- 39
I made a new rifle bag to go with my new flintlock longrifle. It's a "concept experiment" so it departs with how I've made bags in the past.
I obtained some brain-tanned deerhide. The idea was what might a bag of mine look like IF I lived 265 years ago, and was hunting on the frontier, and needed to replace my old bag and to make a new bag. I therefore constructed the bag by sewing it with leather thong/laces, instead of sinew or artificial sinew. Tools were an awl, a pair of repro 18th Century scissors from my sewing kit, and a lead pencil. When completed I did "cheat" a bit by applying Mink Oil, instead of making something from beeswax and animal fat myself.
The coloring of the bag is as the leather was, after applying the Mink Oil.
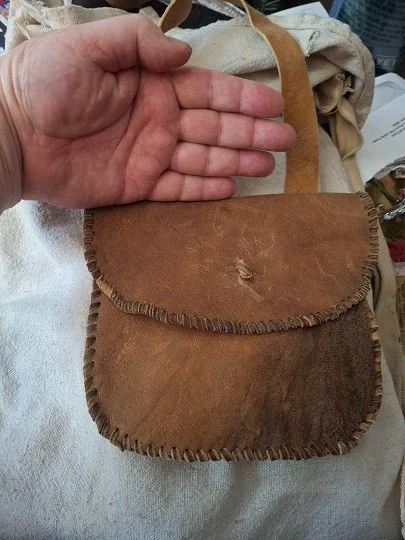
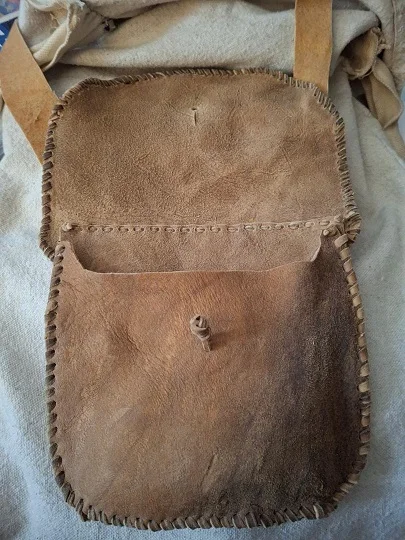
My left hand is in the photos to provide "scale"...
The seam from the joining of the front and back pieces, is welted, although that cannot be seen, and the welt was treated with Mink Oil before sewing.
The edge of the flap, and the edge where the front and back pieces were sewn with a welt, were done in a whip-stitch, as such a stich created a protective leather layer to protect thin edges of the deer hide. One must be careful that the leather thong/lace does not twist while sewing.
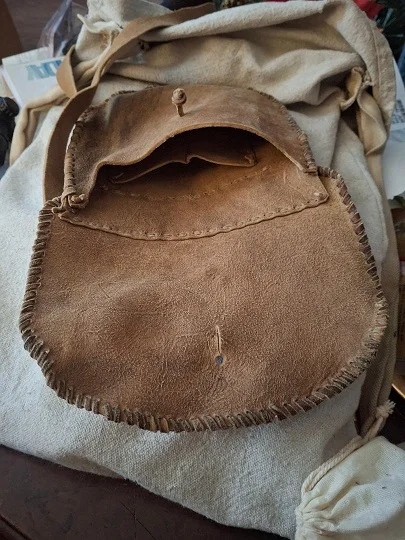
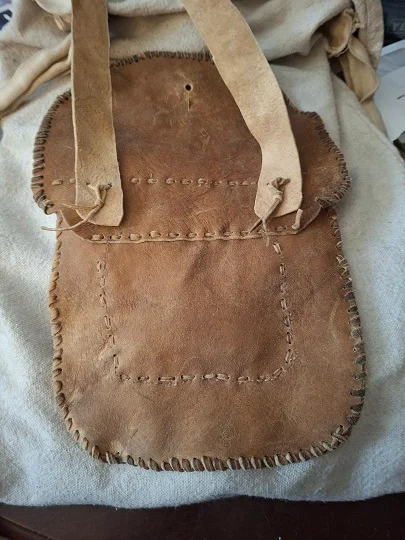
Attempting to show bag interior having a small, inner pocket, and also to show the back detail.
The flap and the inner pocket were done with a running stitch, instead of a saddle stitch. The idea was for the hole where the leather lace/thong passes, to constrict around the lace/thing, after the leather lace/thong was passed through. This would help to seal the bag from external moisture, and it was thought that passing a second bit of leather lace/thong through the same hole to form a saddle stitch might make that seal harder to obtain.
No hardware is found on the bag. No metal button for the flap, no buckle(s) for the strap. Mink Oil was applied after construction was finished, because I thought that I observed the leather less resilient -less prone for the holes in the leather to shrink down around the leather lace/thong when it was previously treated with Mink Oil. Perhaps the Mink Oil should've been applied to the individual pieces prior to assembly. We shall see how well the bag protects its contents from the rain and the damp.
LD
I obtained some brain-tanned deerhide. The idea was what might a bag of mine look like IF I lived 265 years ago, and was hunting on the frontier, and needed to replace my old bag and to make a new bag. I therefore constructed the bag by sewing it with leather thong/laces, instead of sinew or artificial sinew. Tools were an awl, a pair of repro 18th Century scissors from my sewing kit, and a lead pencil. When completed I did "cheat" a bit by applying Mink Oil, instead of making something from beeswax and animal fat myself.
The coloring of the bag is as the leather was, after applying the Mink Oil.
My left hand is in the photos to provide "scale"...
The seam from the joining of the front and back pieces, is welted, although that cannot be seen, and the welt was treated with Mink Oil before sewing.
The edge of the flap, and the edge where the front and back pieces were sewn with a welt, were done in a whip-stitch, as such a stich created a protective leather layer to protect thin edges of the deer hide. One must be careful that the leather thong/lace does not twist while sewing.
Attempting to show bag interior having a small, inner pocket, and also to show the back detail.
The flap and the inner pocket were done with a running stitch, instead of a saddle stitch. The idea was for the hole where the leather lace/thong passes, to constrict around the lace/thing, after the leather lace/thong was passed through. This would help to seal the bag from external moisture, and it was thought that passing a second bit of leather lace/thong through the same hole to form a saddle stitch might make that seal harder to obtain.
No hardware is found on the bag. No metal button for the flap, no buckle(s) for the strap. Mink Oil was applied after construction was finished, because I thought that I observed the leather less resilient -less prone for the holes in the leather to shrink down around the leather lace/thong when it was previously treated with Mink Oil. Perhaps the Mink Oil should've been applied to the individual pieces prior to assembly. We shall see how well the bag protects its contents from the rain and the damp.
LD


![Pampers Sensitive Baby Wipes, Clinically Proven, Fragrance Free, Unscented, Water Based, Hypoallergenic, Multi-Use, Hand Wipes 336 Wipes Total (6X Flip-Top Packs) [Packaging May Vary]](https://m.media-amazon.com/images/I/41KLBHu9CAL._SL500_.jpg)








